

You were planning to get a candid, and now you got yourself a vintage – all thanks to the grainy specks on your digital photo. This is not the first time, but it has happened several times before. Whether it’s a digital camera or an Android or iPhone, grain specks remain. Formally referred to as digital noise, the primary causes for a grainy photo are – a higher ISO setting or a long exposure. So, how to fix a grainy photo? This piece of content will give you a brief outline.
As you will scroll down – you will get to know the ways to fix grainy photos in the normal way, ways to use software like Lightroom and Photoshop, and cracking the solution to fixing grainy photos in your handsets.
Table of Contents
Why are you getting grainy photos?
Some of the primary reasons behind getting grainy photos with a digital camera are – poor luminance due to high ISO settings, overheated sensors, smaller sensor sizes with lower resolution levels, and lower exposure.
Now that you have clarity about the causes of grainy pictures, you will want to find out how to fix them. Here are the ways –
How to fix a grainy photo in a normal way?
It is much better to avert the problem than sitting there and solving it, correct? Well, before you go correcting the clicks, here are some ways to avoid them –
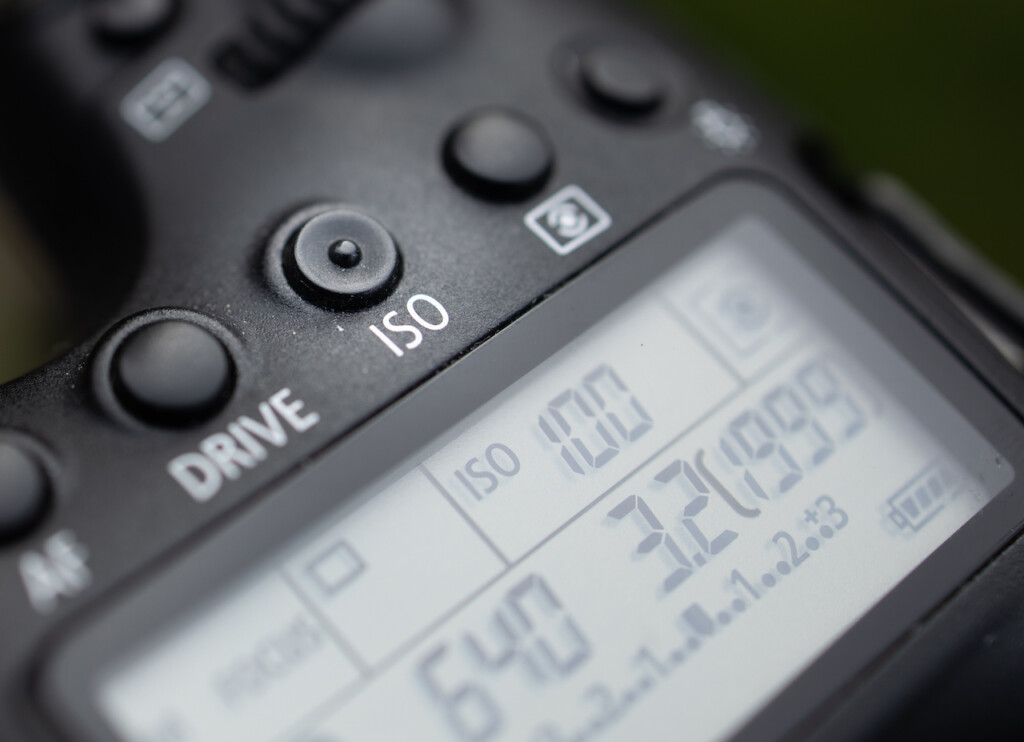
1. Using a lower ISO setting
This is one of the first things that you need to consider while clearing up grainy photos. What is your ISO setting? If it is kept at a higher level, you will have to shoot it down in tandem with the ambient darkness of the area since – the lower the ISO levels (keep it nearer to 100) – the lower the chances of getting grainy specks on the pictures.
2. Allowing a certain level of overexposure
You would be surprised to know this, but overexposing the photographs and, as mentioned above, reducing the ISO settings, will get you pictures that are clearer. Also, to derive maximum benefit – you will have to enhance the aperture and lower the shutter speed.
#However, be careful of the fact that if you overexpose – then it may happen that you will lose specific details since the image would be blown up. Be prepared for the same.
3. Activating the noise reduction format
If you are looking out for ways how to fix a grainy photo – you will have to reduce the noise levels. Most modern digital and DSLR cameras come with integrated noise-reduction features. You will have to activate it within the low to medium range and avoid the high range.
4. Setting the focus on the brightest object
You need to focus more on the light when it comes to getting clearer pictures. When you set the focus on the brightest object (not considering the flashes or otherwise) – it will automatically cut down on the noise and improve the luminosity of that point.
In case of unavailability of these features, there are a host of ready-to-install apps that do the needful.
5. Tweaking the settings to include RAW format
When you have options about choosing how to fix a grainy photo, it is best to go in for RAW format rather than JPEG format – since RAW allows you greater control and provides editable pictures that may be further changed as per requirement.
6. Allowing more light format
This is the last of the options that you would like to put forth. Keeping aside the flash option, you may choose settings like softbox or reflector. Enhance the light levels and be assured of removing graininess in the pictures.
How to fix a grainy photo with software?
You can use the above-mentioned ways to avert the grainy specks in your clicks. In case there’s a glitch in any of them, or you forgot to tweak the settings and the pictures did not come out correctly – it is time to do some damage control. There are two softwares – Photoshop and Lightroom that will assist you in fixing grainy pictures. Let’s check how they work –
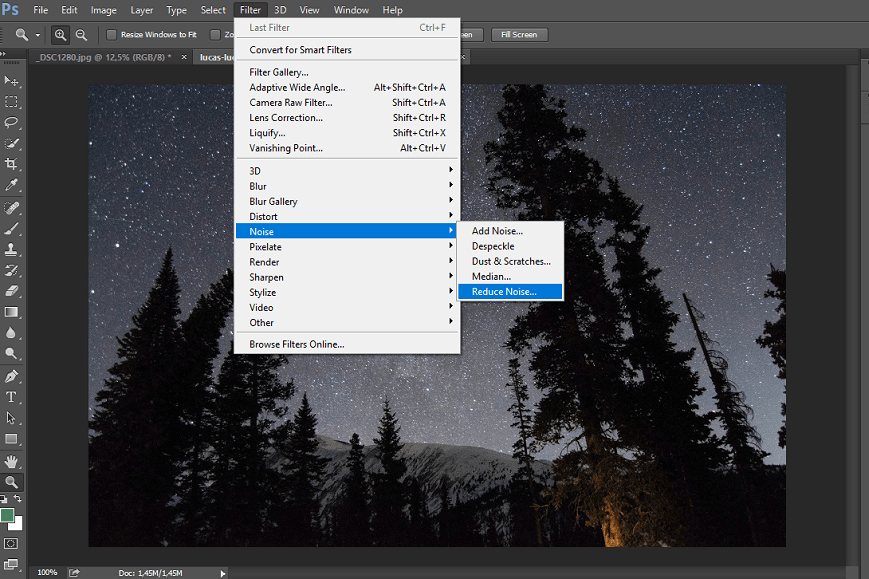
1. Using Photoshop to remove grainy specks
Every time you are wondering how to fix a grainy photo or how to edit the picture to match the color standards – Photoshop is the software that will have your back. Though one uses it for numerous benefits, let’s concentrate on its use for fixing photos –
- When you get a grainy photo, open that image in Photoshop. Click on the Filter icon, which will give way to the Noise button, from where you will be able to go to – Photoshop Reduce Noise window.
- In this pop-up, you will find a range of commands such as – Reduce Color Noise, Preserve Details, Sharpen Details, and Strength.
- You will have to adjust the sliders according to the clarity of the picture that you want. Hypothetically – you can raise the level of Strength to ‘10’ while the Colour Noise is pulled up to ‘100.’ At the same time – you will have to pull down the Sharpen Details to 0%
- Once these details are fixed, you will have to Remove JPEG artifact to get the actual edited picture. Keep the pictures in the RAW format.
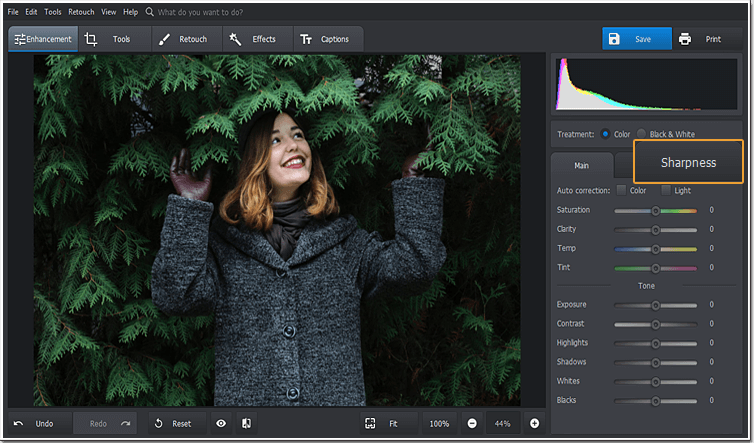
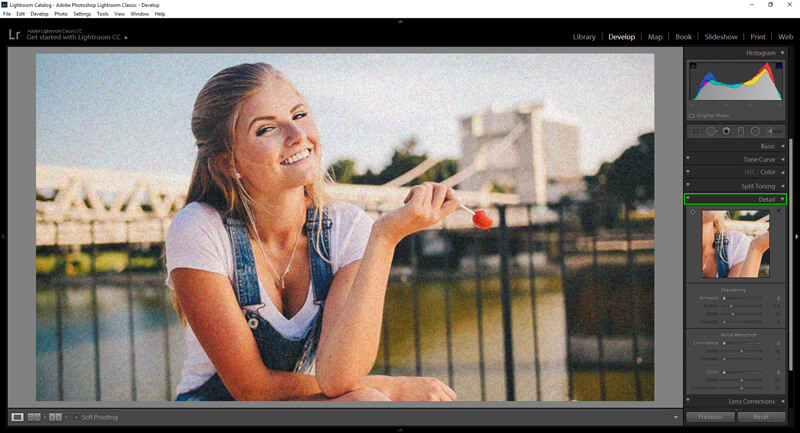
2. Using Lightroom to remove grainy specks
If you want to know how to fix a grainy photo if you sre noit using Photoshop – then this section will introduce you to Lightroom. This is another software that helps you to correct grainy photos. Here’s the way to do it –
- Open the concerned image in the Lightroom profile. You will immediately see an option such as – ‘Develop.’
- When you get to check out that Develop icon, you will see options on the right-hand side of the software – choose the Detail icon.
- On that panel you will have to click on the Noise Reduction area – wherein the slider defining the Luminance level will show you the changes in the grainy picture.
- You will have to adjust the sliders according to your demands. However, on a hypothetical scale we could – pull up the Luminance level to 100%, while the Contrast can be pulled up to 27%. To get a smoother picture – you will have to pul down the Detail icon from 50 to 40-42.
- When you finally open up the picture, you will have a comparatively grain-texture free photo. Stick to the RAW format for best results.
This is a tool that is used specifically for clearing up pictures which have been clicked using flashes (concerts/gatherings).
How to fix a grainy photo in handsets?
Assuming that you have read the above pointers and now have a basic idea about fixing a grainy photo in a camera – it is pertinent to know how to do the same in your handsets. So, how to fix a grainy photo that you have clicked from your cellphone camera? Here are the quick fixes for the same –
1. Noise Reducer Pro app
If you have grainy photos, this is a quick-fix app for you. Available in both iOS and Android versions, it has a 1-step solution that can assure you a clear picture. After downloading it, you will have to – set the noise reduction format between minimum and maximum (as per your requirements). Once done, you can compare the original with the edited picture to see the difference.
2. Lightroom for your handset
If you want to know how to fix a grainy photo in your handsets in one of the easiest ways, experts would again return to Lightroom. You have already seen the wonders the desktop version can do on your pictures. Quite similarly, when you have the mobile version (available free of charge for both iOS and Android versions) – you will find a singular color slider that adjusts the noise balance. In case – you have a subscription to Creative Cloud Photography – you may get to use specific editing tools available in this app.
3. Noiseware
This is another app – that is categorically for the iOS version. One of the best apps, it offers professional preset noise canceling conditions such as – Default, Strong, and Weak or a customized feature to delete the grainy speck. Additionally, it comes with a Night Shot aspect that helps to control and fix low-light pictures.
Wrapping up
Having read it all, you now know how tweaking the camera settings can create a clear picture. If at all this happens – you have certain tools to help you deal with this issue. Therefore, now that you know how to fix a grainy photo, it is best to use the same and clear out the patches from your clicks. Also, if you have any such hack up your sleeve, share it with us in our comments section. Keep watching this space for more!